Category Archives: Cookies

Gingerbread House: Phase 3

Holy moly. Time really flies when making gingerbread. And flies and flies…

Ok, I also take my time. I find myself standing in my kitchen doorway staring at the house and thinking about what’s next and then I realize I’ve been there a while and should probably stop thinking and start doing.

I would have been mostly finished Sunday night if I hadn’t completely b0rked the windows. They were wrong in so many ways… *sigh*

I used chocolate to try to outline the window with the dark accent frames… it failed. Miserably. I couldn’t get the chocolate to a workable consistency. It was either waaaaay too melty or a soft solid. It leaked all over the place, dripped down the sides and generally didn’t do what I wanted it to.  I persisted and finished all of the windows hoping I would have some sort of epiphany in how to fix them, or that when they were all done I wouldn’t be so disappointed.

The final straw was when they were mostly finished and dry I placed them where they were supposed to go and they didn’t fit. And even when I wedged them in under the roof, creating an unsightly gap between roof and wall, they looked horrendous.

ugly

They have been relegated to the realm of mere cookies.

more icing...

I started the windows from scratch on Monday night, measuring the space from roof overhang to ground and prayed that the leftover dough from Sunday would be enough to finish the windows (and the chimney and all the little fill in the space pieces). It was, with yet a bit leftover. Thank god. Since I only had a few chimney pieces.

new windows

aren’t they adorable?

Tuesday I could only hope my mere 200g of dough would be enough to finish things…

P1060580

It was. I finished up the chimney and the attached the windows and filled in all the gaps in both.

lazy

This is me getting tired of holding things in place long enough for the icing to stick… Probably about 1am…

Tonight I finish the decoration and landscaping.

rear viewchimneystill a little rough...

I have a woven gummi patio that I’m pretty stoked about, plus the adorable trees and just wait until you see the property fence 😀  too cute.

woven patio

Gingerbread House: Phase 2

okidokie... time flies when you're making gingerbread!

So, thus far, I have all of the house pieces except a few chimney pieces.  I have the windows, dormers and main walls assembled.

P1060551dormersP1060571

The dormers and windows are coated in chocolate. Going to draw in the window frames with more chocolate... 

The roof is coated in chocolate as well, I will probably do a pretty standard pattern on top with icing and m&m's... 
P1060570

Every time I move I lose my gingerbread board and I have to find a new one. This year I had nothing… except an ikea shelf that was previously part of my coffee table (don’t ask why).
P1060561

property lines

Wrap it in tin foil and voila a 126′ x 46′ lot for a semi-detached home.

P1060565


I have to wait for the chocolate to harden before i can start assembling the roof bits… I am going to try to draw the frames on the windows now. Wish me luck 😛

Not sure if I’ll get too much decorating in tonight though, it may have to wait until Monday. I have a ton of little ideas.

I made a few christmassy cookies, but since its past Christmas I’m going to make mostly ninjabread! This year I decided to try to decorate the ninjas. I’ve made them before but did not want to tackle the icing…
P1060549

tree

These trees are my faveourite!

white ninja

sneaky ninja

Ninjas!!! These guys are too cute.

P1060554

P1060557

Gingerbread Townhouse: Phase 1

I’ve been making a gingerbread house every year I can remember save for a few chaotic ones. I got a few gingerbread templates from somewhere a few years ago and I’ve been making some different styles… Saltbox, Colonnial… This year, I’m trying Townhouse. And I’ve got no template… Well, except for my 3D autocad model! ha.

I wanted a new design this year and I asked a few friends to suggest things and I went with the townhouse idea. Although, upon figuring out the details it looked more like a semi-detached. So I went with it.

cottage

I’m basically doing a semi at 1/4″ scale. I was originally imagining little stairs going up to the doors, but when I realised how tiny those stair pieces were going to have to be, I opted for a ground floor entry.

I’m planning 3 stories high with a front to back gable roof with two dormers. The dormers are where things get complicated. I’ve made some of the pieces at this point, but I didn’t have enough dough first round to make everything. I still have to see whether or not it will fit together the way I intend.

P1060510

My dough was not moist enough for some reason this time. (I just realized i forgot to add a little water) It cracked and just generally wasn’t very smooth when rolled out. Blah. I got the two sides of the houses and some small roof pieces and a few miscellaneous tree cookies and other possible decorations.

Going to make more dough tomorrow and hopefully get everything I need to assemble on the weekend. Probably one more batch to have extra cookies and such.

P1060508

BASIC GINGERBREAD

1 cup unsalted butter – room temp
1 cup brown sugar
1 cup molasses
1 1/2 tsp cinnamon
1/2 tsp cloves
5 cups all purpose flour
2 tsp baking soda
1/2 tsp salt
1/3 to 1/2 cup water.

1.  Beat butter until softened. Add sugar and beat until fluffy.

2. In a seperate bowl, mix together dry ingredients.

3. Add molasses to butter mixture and mix well.

4.  Gradually add dry mixture to butter mixture, continue to stir well. (I use a stand mixer until it gets really tough and then I use my hands for the last bit) Add water 1 tbsp at a time to incorporate the last of the flour.

5.  Form into two discs and wrap in plastic and put in the fridge for several hours but preferably overnight.

6.  Roll out on floured surface to about 3/16″ thick.

7.  Bake at 375° for 8 minutes – until firm but not browned.

8.  Cool on on cookie sheets and transfer to a wire rack.

P1060511

to be continued…

Macaron.

Ok, so, previous post was almost a macaron disaster. They worked in the end… so here is the recipe that I used – slightly modified and simplified compared to the one from the book.

P1060461

MERINGUE BATTER:

3 large egg whites, room temperature
85 grams almond flour
150 grams powdered sugar
65 grams granulated sugar
1 tsp vanilla extract (or seeds from 1/2 vanilla bean)

65 grams sugar150 grams powdered sugar85 grams almond flour

1.  Grind almond powder and powdered sugar in food processor. Sift mixture twice through a medium-mesh sieve.  Set aside.

2. In stainless steel bowl, beat egg whites on high speed until they are foamy.  Gradually add the sugar to the egg whites .

3. Add vanilla and stir lightly.

4. Continue beating egg whites until stiff, glossy peaks form.

5.  Add half of almond/sugar mixture to egg whites and fold into meringue, scooping from bottom of bowl.  Add the rest of the flour mix and continue to fold together.

6. When the batter becomes firm and drips slowly when scooped up, the mixture is done.

batter

Actually, it should be drippier than this. So if yours looks like this, fold it a few more times.

7. Transfer batter to a pastry bag with a .4″ tip and pipe onto parchment covered baking sheet.  Rap the baking sheet against the counter a couple times. This helps the ‘foot’ to form.

8. Let the unbaked macarons sit at room temperature until they are not sticky to the touch.  This can take up to 30 minutes on a dry day.  If it is raining, dehumidifying the room can help.

9. Racks in centre of oven, 375°F.  Stack the sheet with the batter on top of an empty sheet when baking. This helps to prevent the bottoms from heating up too quickly.

10.  Bake for 15-18 minutes – top should be crisp.  Rotate the sheet, front to back, halfway through the baking time to ensure they bake evenly.

**NOTES**

When I attempted these previously with the mint flavour for the meringue I was supposed to use:

1 tbsp dried mint
green food coloring
60 grams  almond flour
60 grams powdered sugar

However, I didn’t. I added peppermint flavouring after I already had the eggs stiff and glossy and they turned to goop. So, don’t do that. haha.  I had a suspicion that it wouldn’t work, and I ignored my gut. Never try baking these without at least 12 eggs on hand 😛

I was also unsure about the reduced quantities of almond flour and powdered sugar…

Chocolate: (book says)

25 grams dutch processed cocoa powder
50 grams almond flour
50 grams powdered sugar

Well,  months ago, when I made macarons for the first time, I used the above chocolate modification to the original recipe and it didn’t turn out. The macarons didn’t puff and there was no foot.

This is where I can’t decide what to do with the modifications the book provides.  25 grams of cocoa is a lot of cocoa, especially compared to 50g of almond and sugar each.  Considering the base recipe calls for 3 times the amount of powdered sugar, I was skeptical about the quantities from the beginning. (why such a great difference in quantities?)

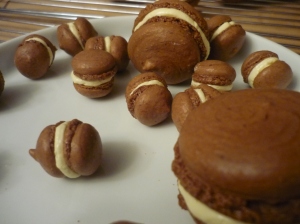
This time when I made the chocolate, I measured out about 15 grams of cocoa (basically, at 15 grams it just looked like enough and it was a nice round number, so I stopped) and kept the almond powder and the powdered sugar the same.  They worked well and taste great (although I think i was lacking some macaronnage). I also didn’t use the vanilla.

18 minutes was WAAAAY too long, so I burned a tray before I settled on about 14 minutes.

BUTTERCREAM:

100 grams unsalted butter
40 ml water
40 grams granulated sugar
1 egg
vanilla extract

P1060472

1. Make sure the butter is at room temperature or maybe even a little warm but never melted. Stir butter with a spatula until creamy and smooth, like mayonnaise.  Set aside.

2. Put granulated sugar and the water into a small saucepan and bring to soft ball temperature – 240°F (116°C)

3. While heating the syrup, break the egg into a stainless steel bowl and beat lightly with a hand mixer.  When the syrup is ready, pour it in a thin thread into the egg while beating it at high speed. (I try to get it right in the beaters…) Reduce speed to medium and beat until the mixture is white and heavy.

4.  Add the butter in three batches.  Beat with a hand mixer at medium speed each time you add the butter. Beat until well mixed.

5.  Pipe or spread buttercream onto macarons.

**NOTES**

The book actually tells you to make the sugar/water syrup in the microwave, but I don’t own one.  The book also doesn’t mention the temperature or the ‘stage’ that you are trying to reach, it simply describes the consistency…

“Scoop some syrup with a spoon and drop it into a small amount of water.  Then try to scoop the syrup out of the water and make a ball with it using your fingers.  If you can do this, the syrup has the right density”.

Well, I tried it this way, but over the stove, my first time doing this. What a pain in the bum. Then I clued in to what she was asking for. Just get a candy thermometer, which should have a label stating the temperature for ‘soft ball’ stage, and do it over the stove.  I take it off just before it hits this temp because it crystallizes very quickly after that and the timing is hard to perfect.

I used the mint flavouring in these since there was no modification in the book… I added just about 1 tsp. I beat it a little after added the flavour and then I just stirred with a spatula and eventually piped it onto the puffs. (obviously I skipped the vanilla)

bite...

I just tasted one (three) and oh god they’re good.

I made these to take to family for Christmas on the weekend and promptly forgot them on the counter.  I *might* have used some bad language when I discovered this half way through a 6 hour drive. However, 3 days later they still taste great. I will now take them to my parents tomorrow.

Merry Christmas!!

Do you ever get the feeling…

that you weren’t supposed to bake something today?

I have that feeling right now.

And I’m in the middle of a batch (er, second) of macarons.

I LOVE these cookies. They are little pieces of heaven. But they are hell to make.

First, I couldn’t decide which flavour. I opted for mint, dug out my peppermint… But the recipe called for dry mint leaves. Instead, I thought “Hey, I’ll just sub in the mint for the vanilla when i make the meringue”. Well, I forgot. So I threw it in on top of the already glossy, stiff eggs and gave it a whirl. The eggs turned into a minty goop and no amount of beating could recover them.

*sigh*

That also meant I was out of eggs… or at least 1 short. Off to the grocery store in the pouring rain and very cold.

Couldn’t find dried mint leaves… got eggs and discovered unsalted butter on sale 😀 whoo hooo!

So, back to decision time. What flavour. I decided on chocolate, which in itself is a scary thing, since the only other batch of these things that failed on me was this chocolate recipe. The recipe book I’m using offers modifications to the recipe depending on what flavour you choose. The chocolate requires 25g of dutch processed cocoa and reduces the powdered sugar and almond flour to 50g each. Last time that didn’t work, so this time i added only 15g of cocoa to the sifted almond/sugar mix and *crosses fingers* I’m waiting on the first batch right now…

mmmmm chocolate

*******************TIME LAPSE*******************

Burnt...

Success!

Well, mostly. Recipe says 18 mins. Much too long. 14 mins is more like it.

But thats ok, my batter is never smooth at the beginning anyways, so I burned the wrinkly ones.

tops

The rest look great! And I made mini ones 😀

The icing was yet another task. I’ve made it before no problem, but getting that syrup to the right temp was killing me tonight. I have a candy thermometer, but this time it crystallized and I … well, I have no excuse. Not quite sure what went sideways…  So onto round 2.

Round 2 icing failed as well. Ugh. It clumped and just blah.

Round 3 however, I got the bowl warmed, I made the egg warm before cracking it, I put a warm wet cloth under the bowl… It worked, finally, and I added the mint to it.

Gee, I’ve wasted lots of eggs tonight 😦

And I also have 6 yolks just waiting for a mission.

Ok, so wow that took way longer than necessary. but THEY’RE SO CUTE!!!

tiny poofs!

The mini ones are adorable.

They’re not as satisfying to eat as the big ones though, because you don’t get that interesting texture when you bite into the middle of it…

nom

I’ll update this later with the recipe… Going to bed now.

spritz cookies: second attempt!

Ok, so when I said 48 cookies was enough… i lied. haha 🙂

aww aren't they cute!

I tried again today… two batches.

two.

I left my butter out all day to make sure it was “room temp” and I also cut out 1/4 cup of flour. The dough was pretty sticky but much smoother. It stuck to the baking sheet well and it separated easily.

I think I’m getting the hang of the press, since I can’t see the dough it’s more a matter of timing.

cookie forest

Decided to dye the second batch green and red… and then put them in the tube at the same time!

tree.

at first I loved it… then I wasn’t sure… then I hated it.  I’m back to not sure.

The trees are cute and the flat ones are nifty. I think the wreaths are my favourite.

oooooo

Spritz Cookies

wafer

So… When I bought my latest cookie press I had the best of intentions. I was going to make a million cookies.

I got about 4 dozen in and that was plenty.

I don’t know if it was my dough or my press… First time testing out my new Pampered Chef press and it was not what I expected…

(Backstory: I’ve been looking for a cookie press for a while. My mom isn’t ready to give up hers yet, but in my memory, that is the best press in the world. I remember making these cookies as a kid and it was time consuming, but every time since has been a royal pain or complete failure.)

Cookie Press

Enter Pampered Chef Cookie Press.

P1060432

Its good and sturdy. Good plastic and it comes apart easily (even with cookie greasy hands).  The tube itself is 3″ in diameter, and maybe I just have little hands, but it really isn’t easy to hold. It’s just slightly too big to be comfortable. It also isn’t the typical “gun” style I’m used to. The press portion is a corkscrew style press… So you turn it to press the batter out. It works well, but it makes the press completely unusable one handed.

P1060430

The nozzle area is actually recessed in the tip, so that you can basically just put the press down flat and there is enough room to press out a cookie, but if you aren’t looking at it from the side while crouched down at counter level, it is really hard to tell how much cookie you have pressed out. I think this is a practice thing, as the more I cookies I pressed, the better I got at estimating… but I had many so many redo’s. Next time I will get a little stool to sit on while I press! haha.

So again, it could be a better press, but I like it for now. There are going to be a lot of funny looking cookies in my future!

P1060426

My other issue was possibly the dough. It wasn’t soft enough, so it didn’t separate nicely from the pressed dough, it sort of ripped and left jagged dough edges instead of that nice soft look these cookies typically have.  My butter was room temp as the recipe asked for… and I whipped it until fluffy… So next time I try a different recipe… or maybe just 1/4 cup less flour.

In the end, although a tad funny looking, I have a bunch of tasty cookies.

P1060427

I used the Joy of Baking “Spritz” cookie recipe this time. Next time I’m going to phone mom to see about her recipe.

Movember Madness

I started a new job last year in mid October and I soon discovered there were other bakers in the office. One of the other bakers ran a Movember Bake sale (by herself) and baked different goodies for order, 3 weeks in a row. Of course I ordered some wonderful chocolaty brownies. (how could I not?!) From that moment on, I had a dream. and that dream was making mustache cookies.

I started searching online immediately to find mustache shaped cookie cutters and I found plenty.

…but they were all back ordered, since it was more than halfway through November already. I gave up the idea that it would happen that year, but I never forgot…  Actually, I did forget, right until about the time I was supposed to be ordering the cookie cutters before it got too late. Ha. My friend and coworker, Jane, with whom I’ve spent many hours discussing baking, found some on the official Movember site and sent me the link just in time to snap me out of my daze.

After a rather lengthy process of trying to set up a paypal account and get the credit card and bank card authorized, then some money transferred… I was beginning to fear I might, again, be too late to order them. During this payment debacle, I came in contact with John from FuzzyInk.com who informed that I would definitely have my cookie cutters in time for Movember and that he would love to see pictures.

I finally got around to emailing the pictures to him recently and I’m also posting them here.

Thanks to everyone who helped raise Movember Money!

Image

ImageImageImageImageImage